The Epinio push process in detail
Epinio makes use of well supported, well known projects. There is further discussion about this in the project principles document. While doing so, Epinio makes sure those components are correctly deployed and work together seamlessly. This detailed description of the Epinio push process lets you understand the components and their relationships.
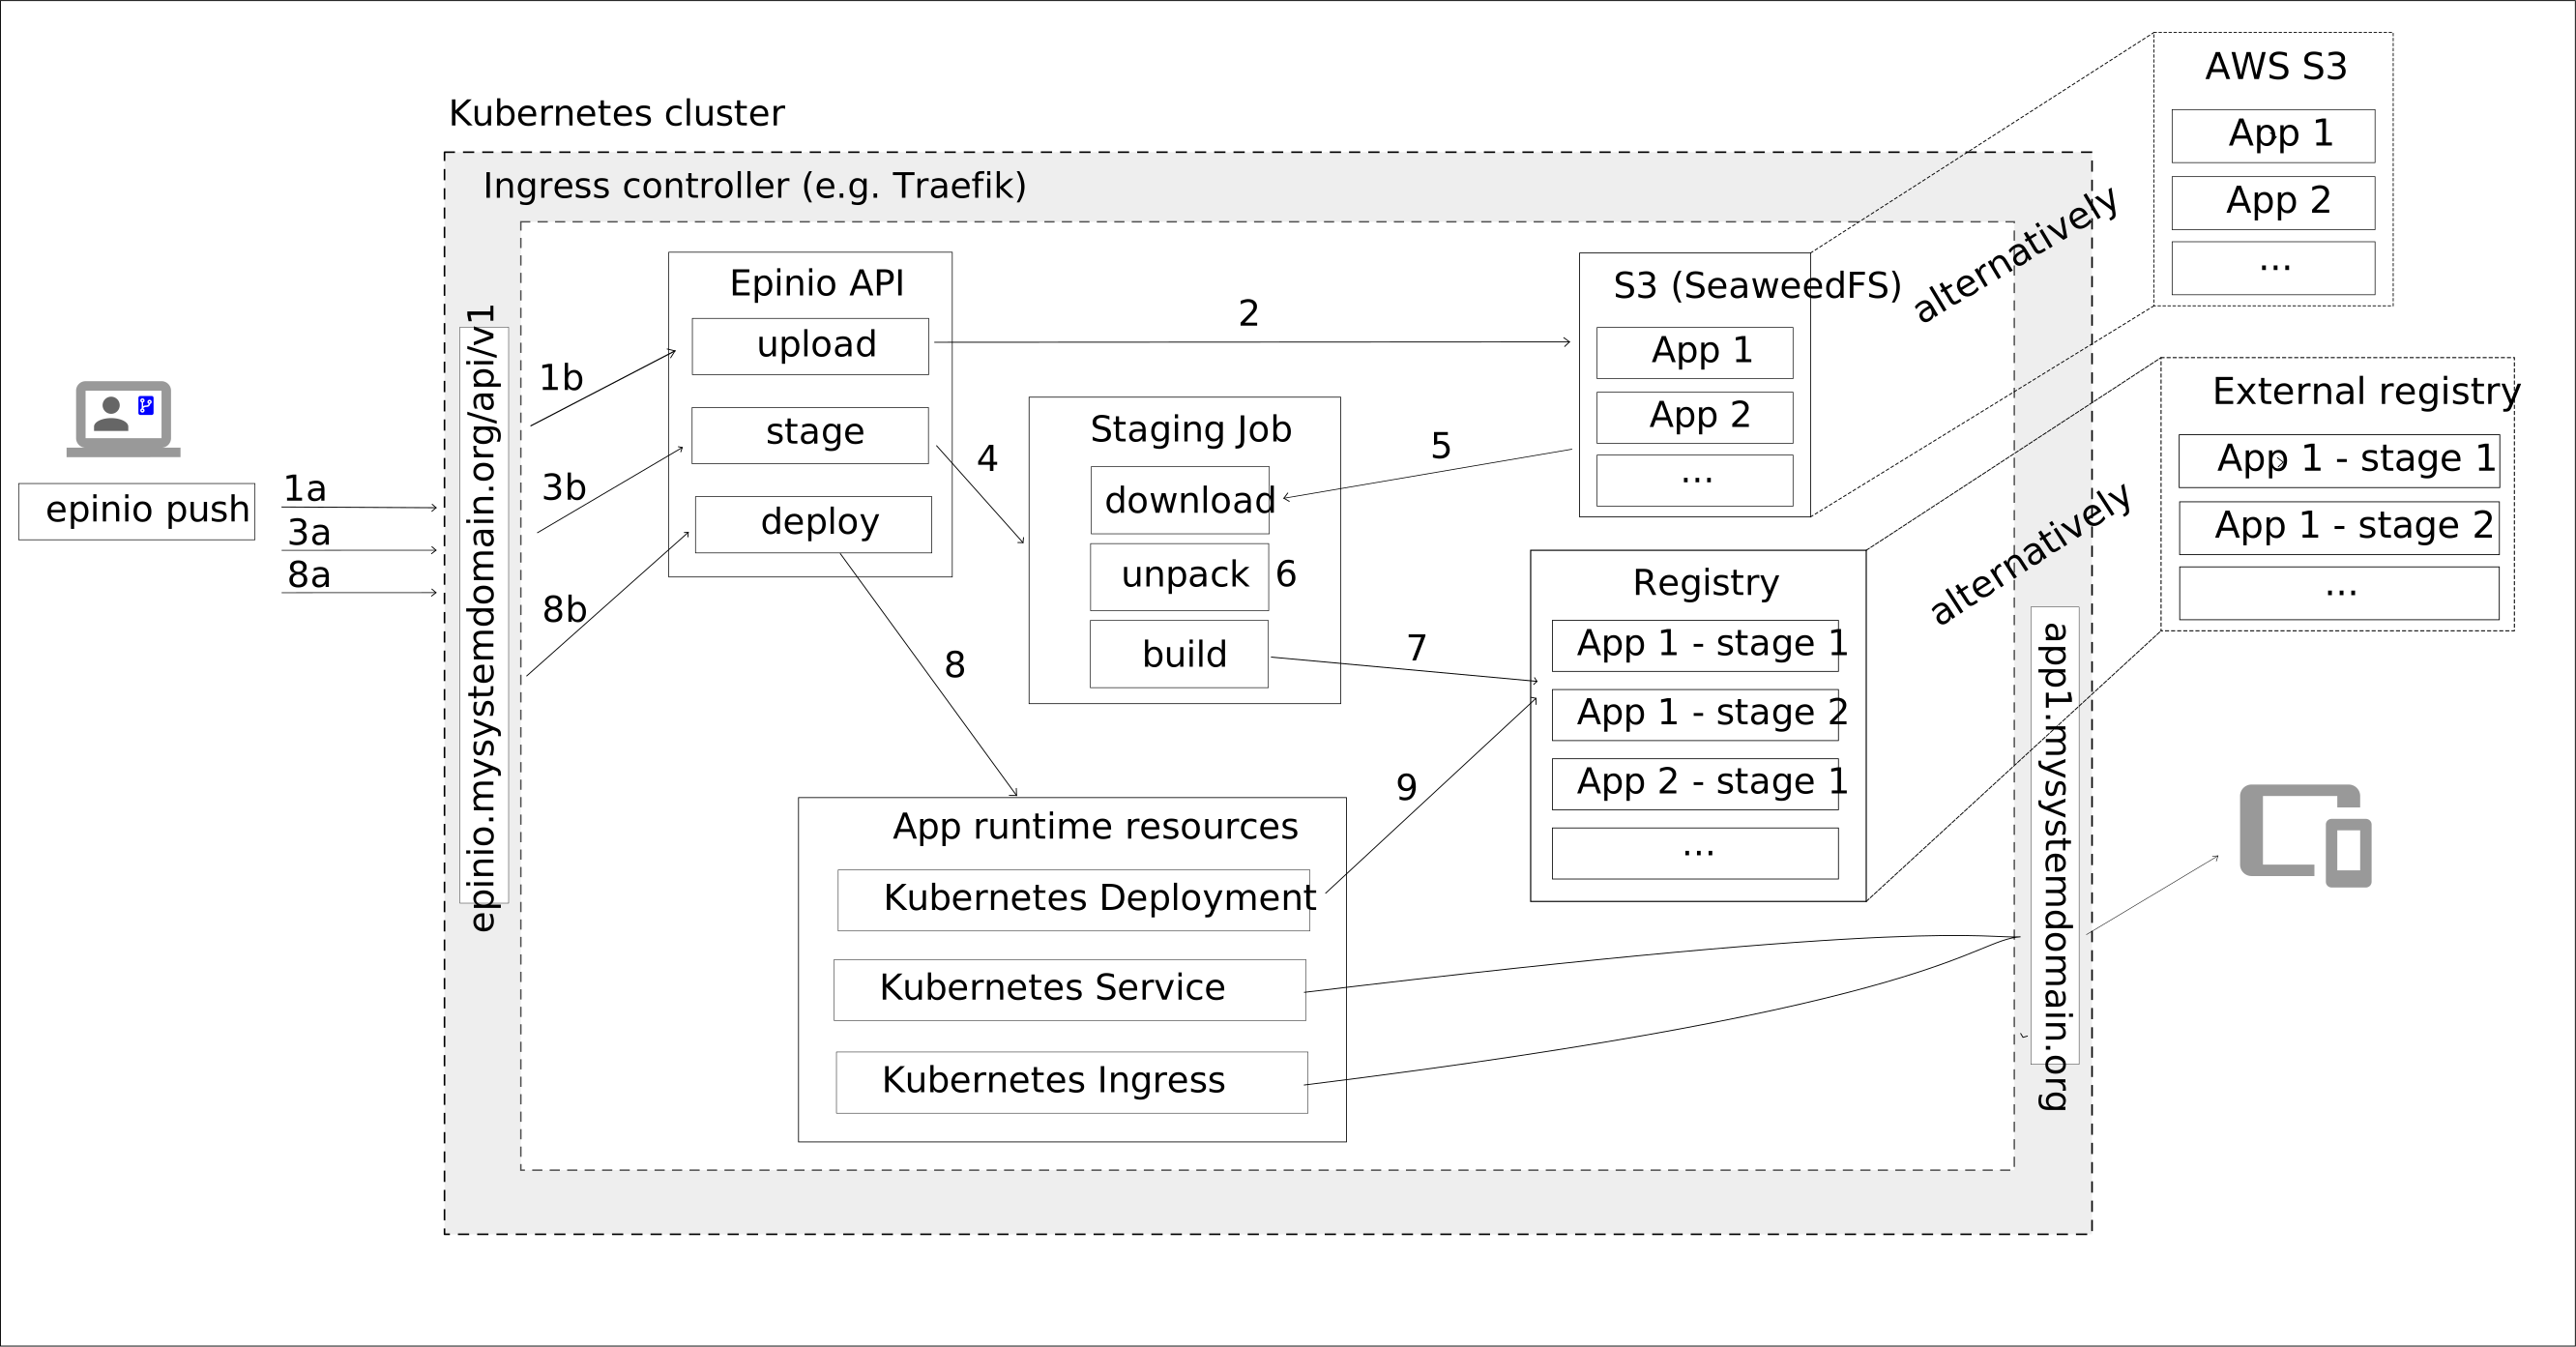
There is a diagram of the Epinio push process later on this page. Refer to it while reading the text to aid understanding. The number labels on the paths in the image indicate process ordering.
Epinio push (step 1)
Epinio exposes an API server, running inside the Kubernetes cluster. It's used by all clients, including the CLI, to communicate with Epinio.
The epinio push CLI command, creates an archive containing application code.
This archive package is uploaded to the API server (step 1a).
A Kubernetes Ingress controller (for example, Traefik) routes your request to the API server (1b).
Request authentication at the API server uses BasicAuth, a session cookie or, if using WebSockets, a token.
Copying the code to S3 (step 2)
The Epinio helm-chart can install either SeaweedFS (the default) or s3gw on your cluster. You can also configure external S3. Both SeaweedFS and s3gw are S3-compatible storage solutions which Epinio uses to store application source code. The chosen S3 storage solution is later used by the staging job.
After successful authentication (step 1),
the API server uploads the package to the S3 endpoint and
responds with a blobUID that can be later used to reference the uploaded package.
Staging the app (step 3)
When the upload request is complete, the CLI sends a request to the stage endpoint of the Epinio API server.
This instructs the server to start the staging of the uploaded code.
Trigger the job (step 4)
When the Epinio API server receives the stage request,
it creates a
Job
that runs the staging scripts using the version of the code referenced in the request.
This job has 3 steps and each one is a script stored in a ConfigMap called epinio-stage-scripts.
The namespace containing the Epinio installation contains this ConfigMap.
The following three sections describe their roles.
Fetch the code (step 5)
This first step of staging, fetching the code, downloads the code from S3 storage. This makes the code available to the following steps.
Unpack the sources (step 6)
The second step of staging detects the type of the archive and unpacks it. Supported formats are: zip, tar, tgz, tbz, and txz
Stage (step 7)
The third step of staging uses the Paketo buildpacks to create a container image for your application. The result of a successful staging process is a new image. This image is pushed to the Registry component of Epinio. Read further information in the Epinio Registry documentation.
Run (step 8)
Only having a container image isn't enough to run a workload on Kubernetes. You need, as a minimum, a Pod running, with at least one container running that image.
The API server provides these requirements on demand by the client (8a) after it finishes the staging process.
The most important resources created (8c) are a Deployment, a Service and an Ingress resource.
The needed resources are part of a Helm chart which Epinio uses to deploy the application. The application Helm chart source is located here: Epinio application helm chart.
As it's a Helm release, you can list the deployed applications using Helm:
helm list -n workspace
This assumes application deployment is in the workspace namespace.
Pull image (step 9)
The Deployment uses the image pushed as part of the staging step (7). Now, the kubelet pulls the image from the registry so the deployment resource can use it (9).
You can read how these resources work in Kubernetes using the provided links but if you have to know one thing is that Ingress is the thing that describes how a request that uses the Application's url is routed to the application container. In Kubernetes, the thing that reads that description and implements the routing is called an Ingress Controller. Such an Ingress Controller is provided by Traefik.
Ingress implementation
Epinio needs an ingress controller to work.
Something needs to manage routing your applications URL to the application container. The Kubernetes component that describes and implements this routing is the Ingress Controller. Traefik is an Ingress Controller used by the Epinio project.
The ingress controller reads your Ingress Resource Definitions and implements the desired routing to the appropriate Services/Pods.
There is further information in the ingress controller section in "Advanced Topics"
In Epinio, for every application, you create an Ingress that routes the traffic for the application through a subdomain that looks similar to this:
myapplication.my_epinio_system_domain.com
You can get your application routing with epinio apps list or epinio apps show myapplication.
By specifying one or more --route options, either with the epinio push command or later with epinio app update,
it's possible to set and use arbitrary custom routes for the application.
You need to make sure that these custom domains point to your Ingress controller IP.
The process diagram
Credits
- Icons from: https://materialdesignicons.com/ (Source: https://github.com/Templarian/MaterialDesign)